# Data Driven Testing
WARNING
This feature is available as part of vREST NG Pro/Enterprise version. Some features like iteration specific request fields, iteration specific assertions, etc. are introduced in vREST NG v2.3.0. Features like test suite level iterations, hook level iterations, feature related to outputVarName are introduced in vREST NG v2.5.0.
In this guide, we will see how you may perform data-driven testing in the vREST NG Application by feeding data through CSV or XLSX files.
# Contents
- What is data driven testing?
- Benefits of data driven testing
- Linking spreadsheet file with API test case
- Iterating over spreadsheet data in API test case
- Binding request and response logic with spreadsheet's columns
- Writing test data in spreadsheet file
- Running data driven API tests
- Maintaining data driven API tests
- Generating data driven API tests
- Sample Project to demonstrate data driven testing in vREST
- Known issues and their solutions
# 1. What is data-driven testing?
We use several methodologies in making our software testing processes faster and effective. Data-driven testing is one such methodology.
It is an approach to test automation in which the test data is stored into a spreadsheet (or any other data source), and the automation logic is written separately from the test data.
The test data is eventually fed to the automation logic to validate different test conditions.
# 2. Benefits of Data Driven Testing?
You will get the following benefits when you implement the data-driven API testing methodology for your API automation in vREST.
Creates Separation of Concerns: Data-driven testing greatly helps you in separating the automation logic from test data. In vREST, the automation logic can be written in the form of test cases and for data inputs, you can leave variables, which will be used later. And these variable values can be picked up from the spreadsheet file.
This way you can separate the work of writing Test Data and Automation Logic, eventually saving a lot of time and effort.
Does not require technical knowledge: Writing test cases has always been really easy in the vREST, but when there is minimal need to alter the test logic and just make changes in the spreadsheet, then this can be easily done by anyone who does not even have a technical background.
Real-time editing with live spreadsheet integration: vREST allows you to link the spreadsheet file. After that, you just update your test data in the spreadsheet file and changes will be reflected in real-time in vREST without importing the spreadsheet file again.
Support of variables/scripting: vREST allows you to use any variable(s) (global/extracted/special) and further it also allows you to invoke any script (utility method) to calculate/process anything to fill data.
Highly maintainable test cases: Maintainability of your test cases is enhanced at a great level, because of the following factors,
- Minimization of test cases: You will have a very limited number of relevant test cases left because now you don't have to create an individual test case for each type of test data input.
- Easy to make changes: Making changes in data becomes very easy because you just need to make changes in a spreadsheet file (CSV files, XLSX files), and you are not concerned with the test logic at all.
- Easier maintenance: In the future, if the API response structure of the API under test changes then you just need to update the referenced response schema in a single place. And for response content changes, you just need to review the diff report and then just click on a button to fix your spreadsheet data automatically.
# 3. Linking spreadsheet file with API test case:
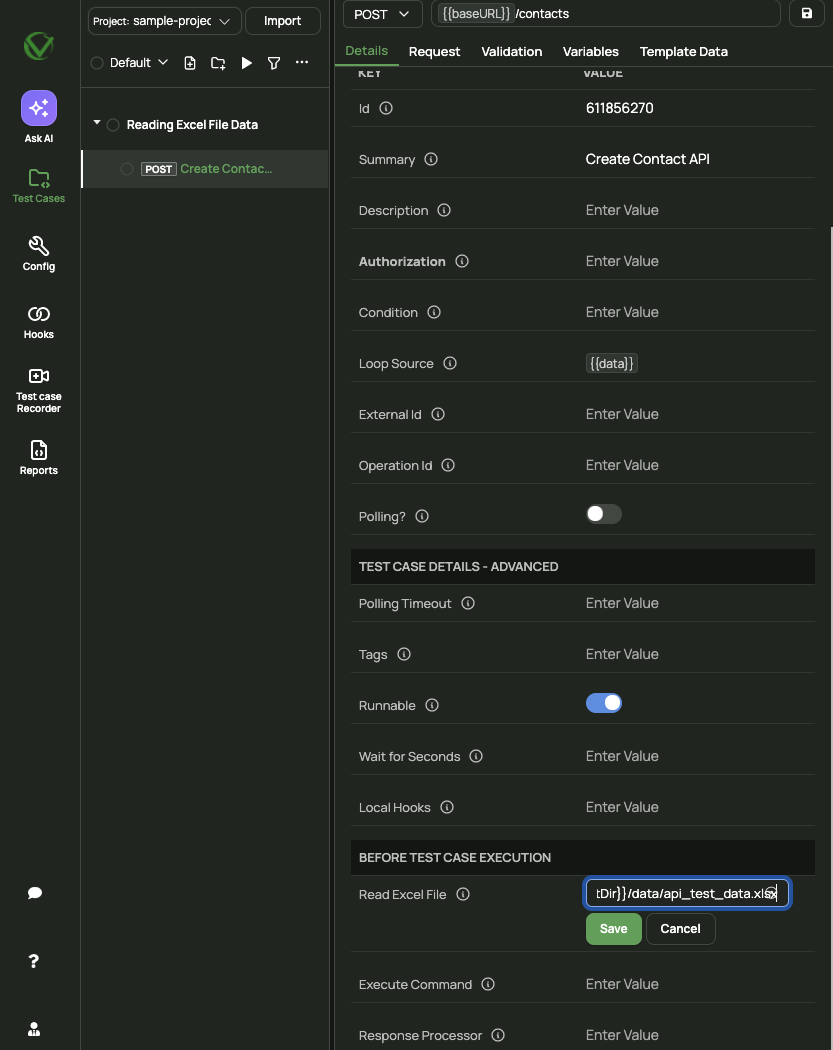
Spreadsheet file can be linked with API test case by providing the CSV/XLSX file path in the field Read Excel File available in the Details tab of the test case as shown in the figure below.
In the same way, you may configure the spreadsheet for test suite or hooks as well.
vREST stores all the test cases inside the configured project directory. We recommend you create a data directory inside the project directory to store all the CSV or XLSX files for easier team collaboration. You may access the project directory path by using a special variable {{$projectDir}}. So, your spreadsheet file path should be something like this:
{{$projectDir}}/data/csv_file_name.csv
or
{{$projectDir}}/data/xlsx_file_name.xlsx
This way, you are not hard coding the CSV/XLSX file path. And same tests will work on any team member's machine.
If you are using an XLSX file, then by default, vREST will read the data from the first sheet in the XLSX file. If you want to read the data from a specific sheet in the spreadsheet then you may provide the option sheetName in a query parameter format in the file path:
Read Excel File: {{$projectDir}}/data/api_test_data.xlsx?sheetName=create_api
One example use case of this feature is that you may organize all your test data in a single spreadsheet file and each individual sheet in the spreadsheet file corresponds to the test data for each API.
For Create API:
Read Excel File: {{$projectDir}}/data/api_test_data.xlsx?sheetName=create_api

For Retrieve API:
Read Excel File: {{$projectDir}}/data/api_test_data.xlsx?sheetName=view_api

For Update API:
Read Excel File: {{$projectDir}}/data/api_test_data.xlsx?sheetName=update_api

For Delete API:
Read Excel File: {{$projectDir}}/data/api_test_data.xlsx?sheetName=delete_api
# 4. Iterating over spreadsheet data in API test case:
vREST automatically converts the spreadsheet file data into the JSON array. Where each array item corresponds to the individual spreadsheet row. vREST stores this JSON array in a variable named data which you must feed to your test case via the Loop Source property as shown in the previous screenshot. Once you set the {{data}} in the Loop Source field, then if you execute the test then vREST will execute this test case multiple times as per the rows available in the CSV or XLSX file.
To change the output variable name used to store the excel sheet data, you may pass an argument outputVarName in the file path. e.g.
Read Excel File: {{$projectDir}}/data/api_test_data.xlsx?outputVarName=testData
Now, you may set {{testData}} in the Loop Source field.
# 5. Binding request and response logic with spreadsheet's columns
vREST allows you to structure your spreadsheet file, however, you want. And it allows you to bind the request data (e.g. query parameters, request body, request headers) and response validation data (e.g. status code, expected response body, expected schema name, etc.) through the spreadsheet's columns. As we already knew from the previous step that {{data}} contains all the records available in the spreadsheet file. And you may access the individual row of the spreadsheet file using {{data.$}}.
Here, $ represents the row index.
And you may access the individual spreadsheet's columns using the syntax {{data.$.COLUMN_NAME}}. You may use this syntax anywhere in the Request and Validation tab of the API test case. Now let's see how you may bind spreadsheet's columns by looking at some example screenshots.
We recommend you to not put any spaces while defining the column names in CSV/XLSX files for easier access to column data in the vREST application.
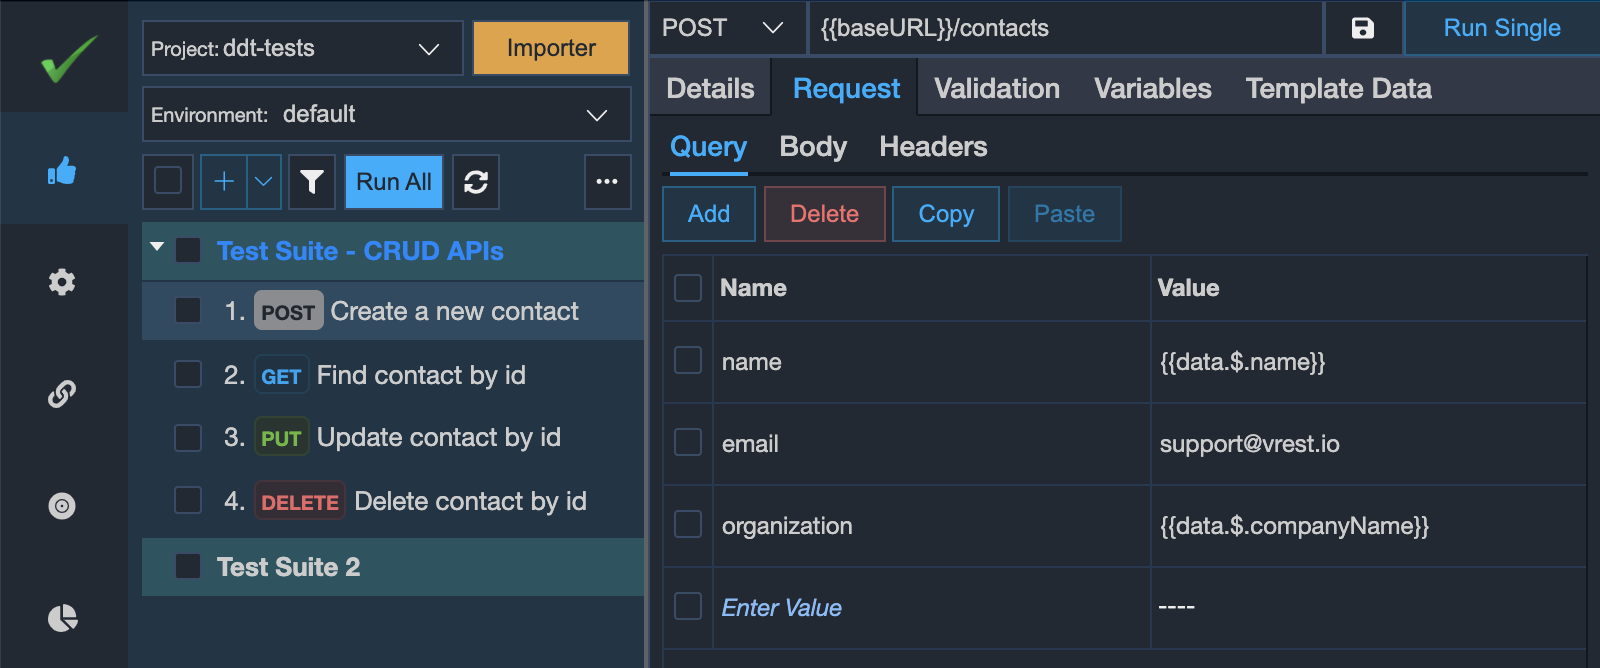
# Binding query parameters
The following screenshot describes an example scenario of binding the query parameters with the spreadsheet's columns. As we can see that it is not necessary to bind each query parameter with the spreadsheet's column. And column name can be different from the query parameter name as well. If you don't want to send any query parameter in a particular iteration then just set the value as $$skip in the spreadsheet column in that particular row. vREST will not send that query parameter in the API request.
So in the below screenshot, if vREST found the value of the name parameter as $$skip for a particular iteration in CSV/XLSX file then vREST will skip that query parameter in the API request for that iteration.
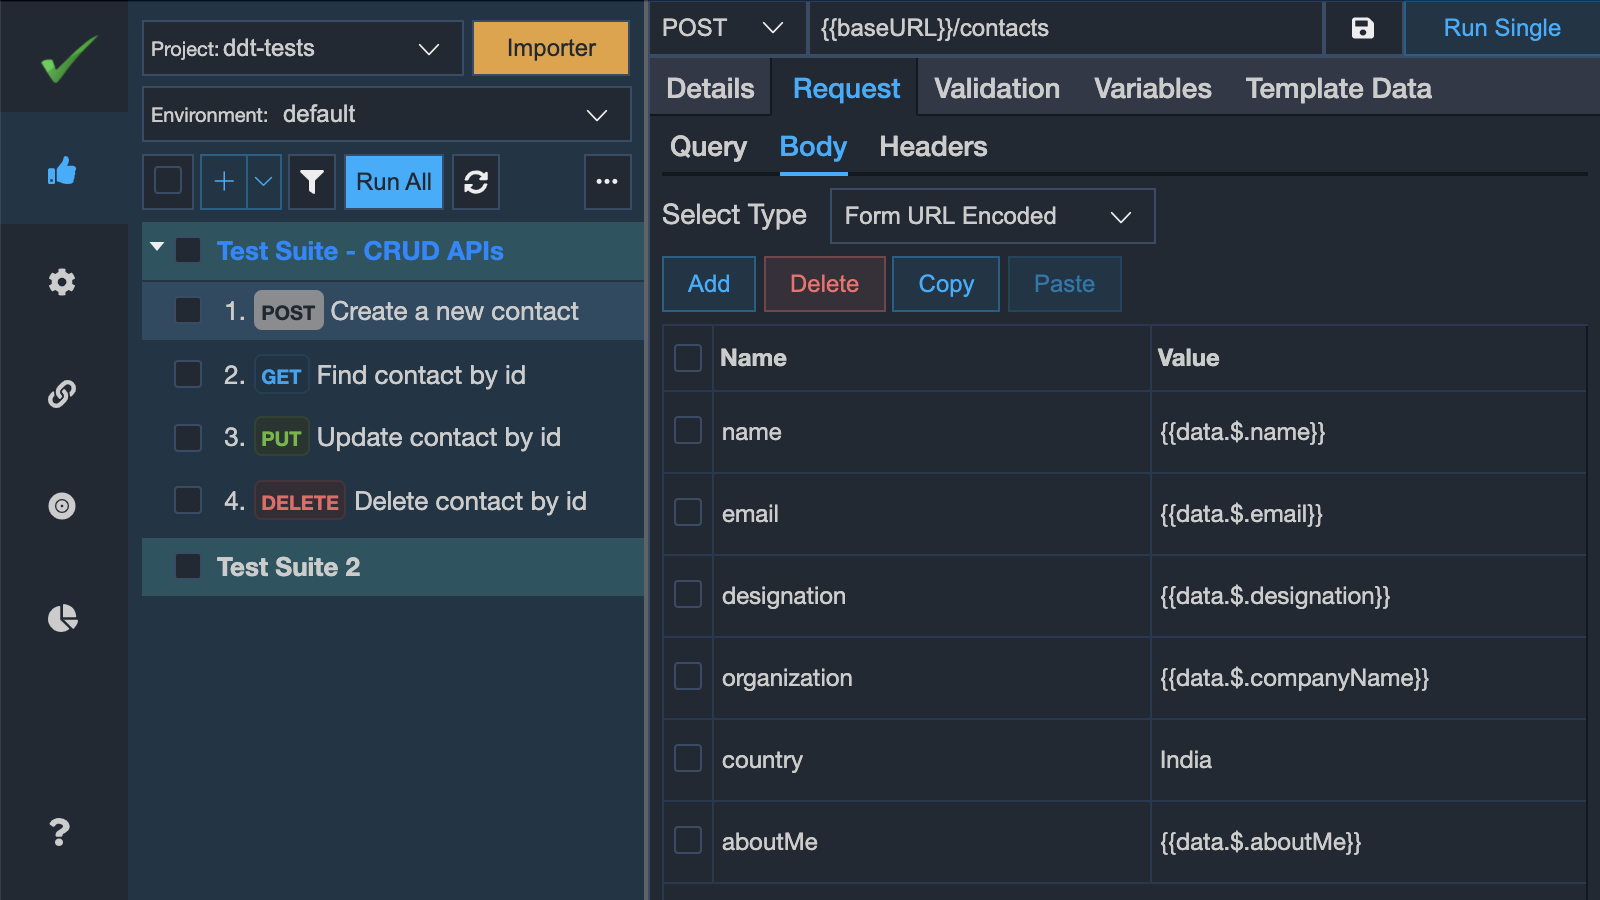
# Binding form parameters
Similarly, you may bind the form data using parameters as shown in the below screenshot. And you may skip a form parameter from the API request (or from a specific iteration) by setting the value as $$skip in the spreadsheet column in that particular row. vREST will not send that form parameter in the API request.
# Binding request body (JSON,XML,...)
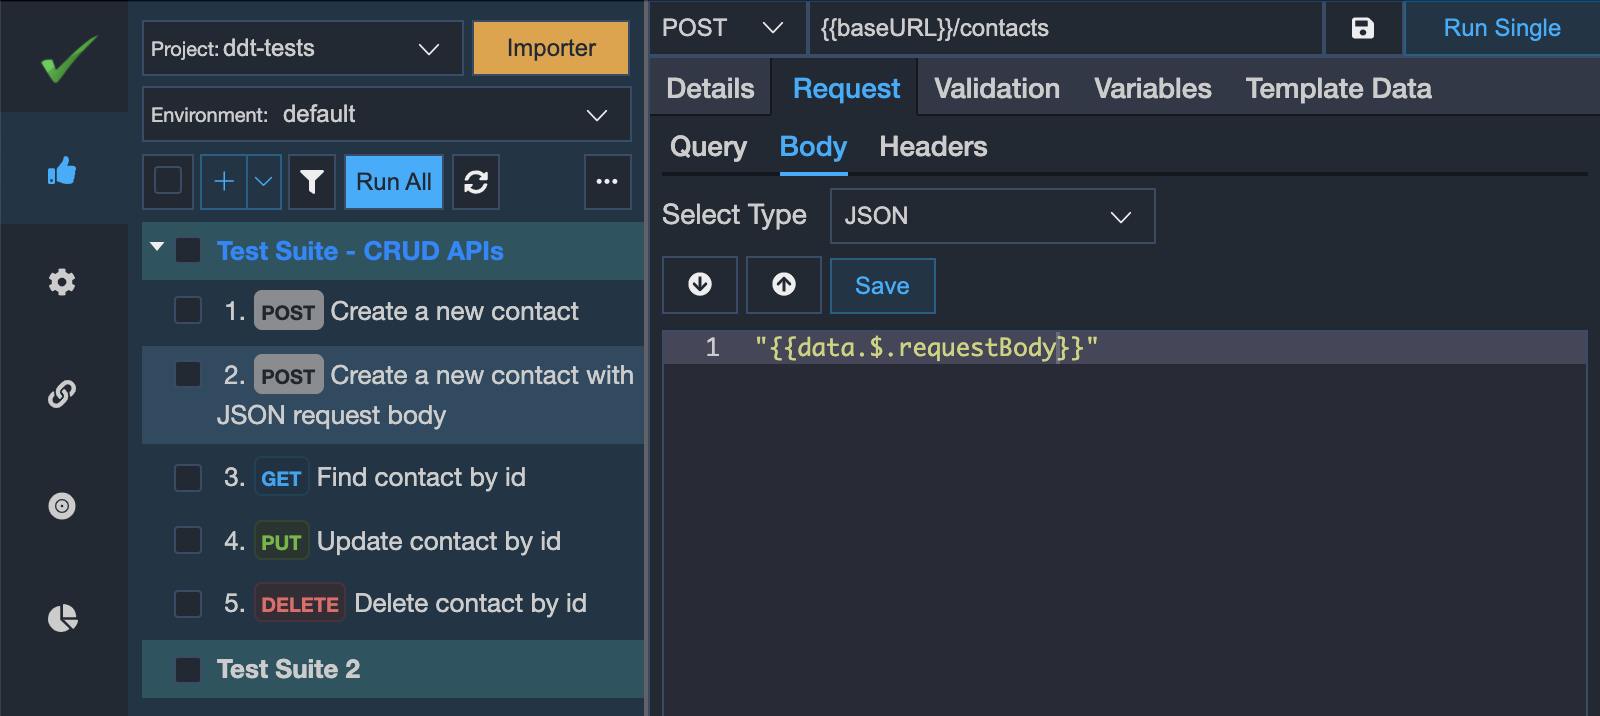
For binding the request body, there are multiple approaches. Either you may have a single column say requestBody in the spreadsheet file or you may have multiple columns as per your JSON or XML structure.
If you want to maintain the whole request body in a single column in the spreadsheet file then you may specify it as per the screenshot below:
And if you want to maintain it through multiple columns in the spreadsheet file then you may specify it as per the screenshot below. Again you may set the column value as $$skip if you don't want to set the value for a particular iteration in the JSON request body.
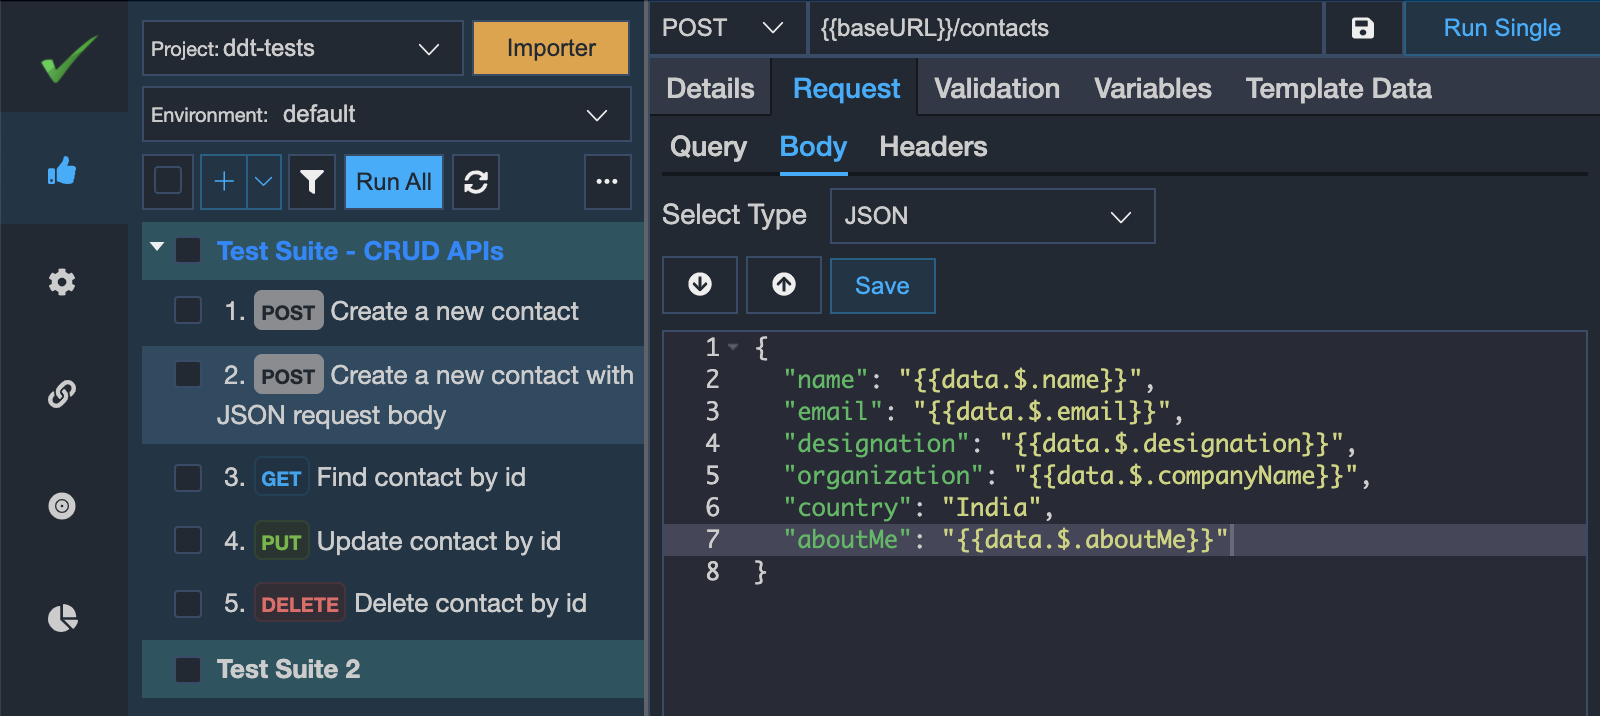
Suppose, if your JSON body accepts numbers or booleans or objects then you may use the built-in utility methods to send the proper JSON request body as shown below. You may even define your own custom utility methods to process the input received from CSV/XLSX file.
{
  "name": "{{data.$.name}}",
  "age": "{{number('{{data.$.age}}')}}",
  "isMarried": "{{boolean('{{data.$.isMarried}}')}}",
  "address": {{object('{{data.$.address}}')}}
}
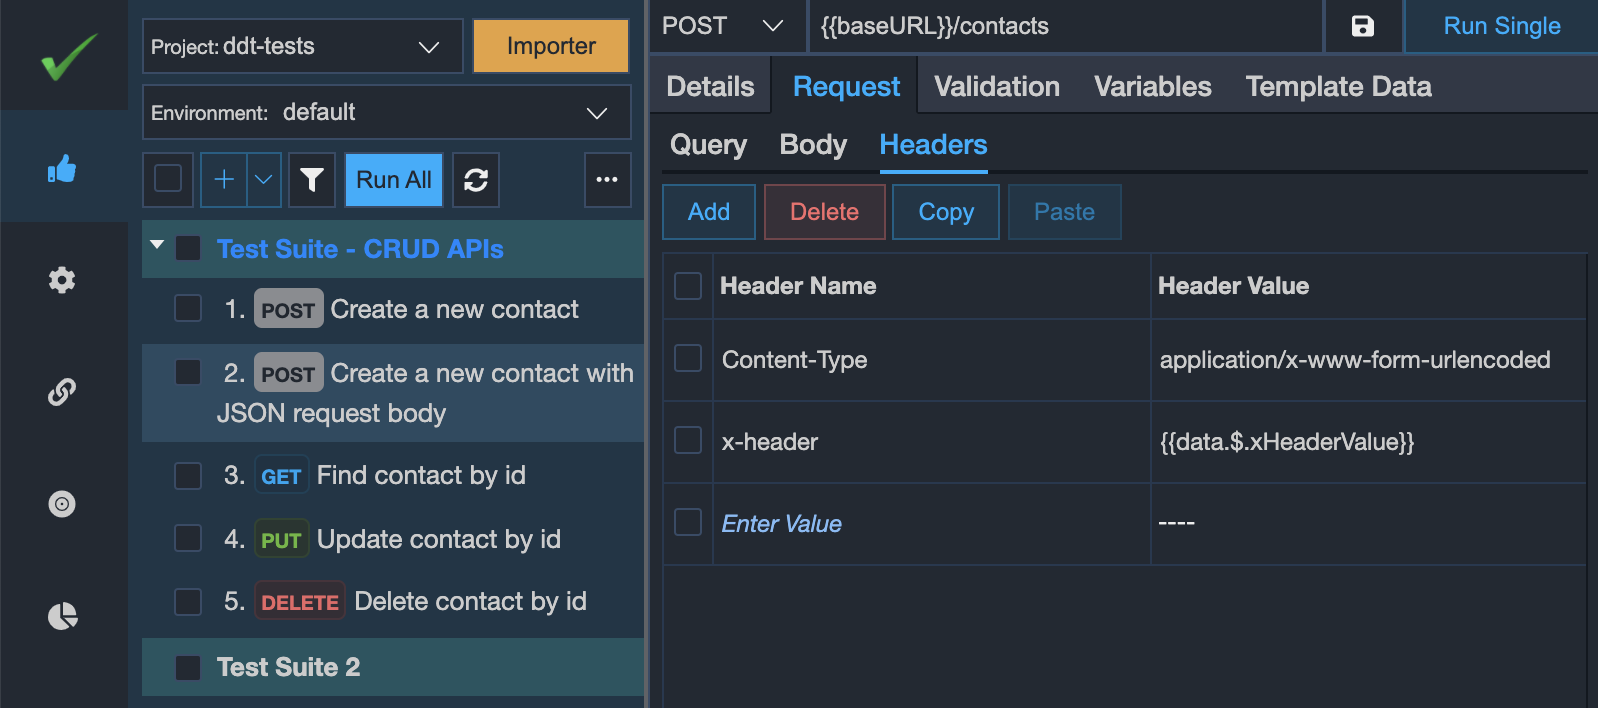
# Binding request headers
If you would like to bind some of the request headers with the spreadsheet columns then you may follow a similar approach as per the query parameters. You may skip some of the bound request headers by setting the spreadsheet column value as $$skip.
# Binding assertions Data in Validation tab
In the Validation > Assertions tab, we may write assertions that are applicable to all iterations but we may bind the expected values from the linked spreadsheet file. Some example use cases are:
- We may validate the positive and negative test conditions through our spreadsheet file. So each iteration's request may return a different status code. So, we may write the expected status code in the CSV/XLSX file and bind that column in our assertion's expected value as shown in the screenshot below.
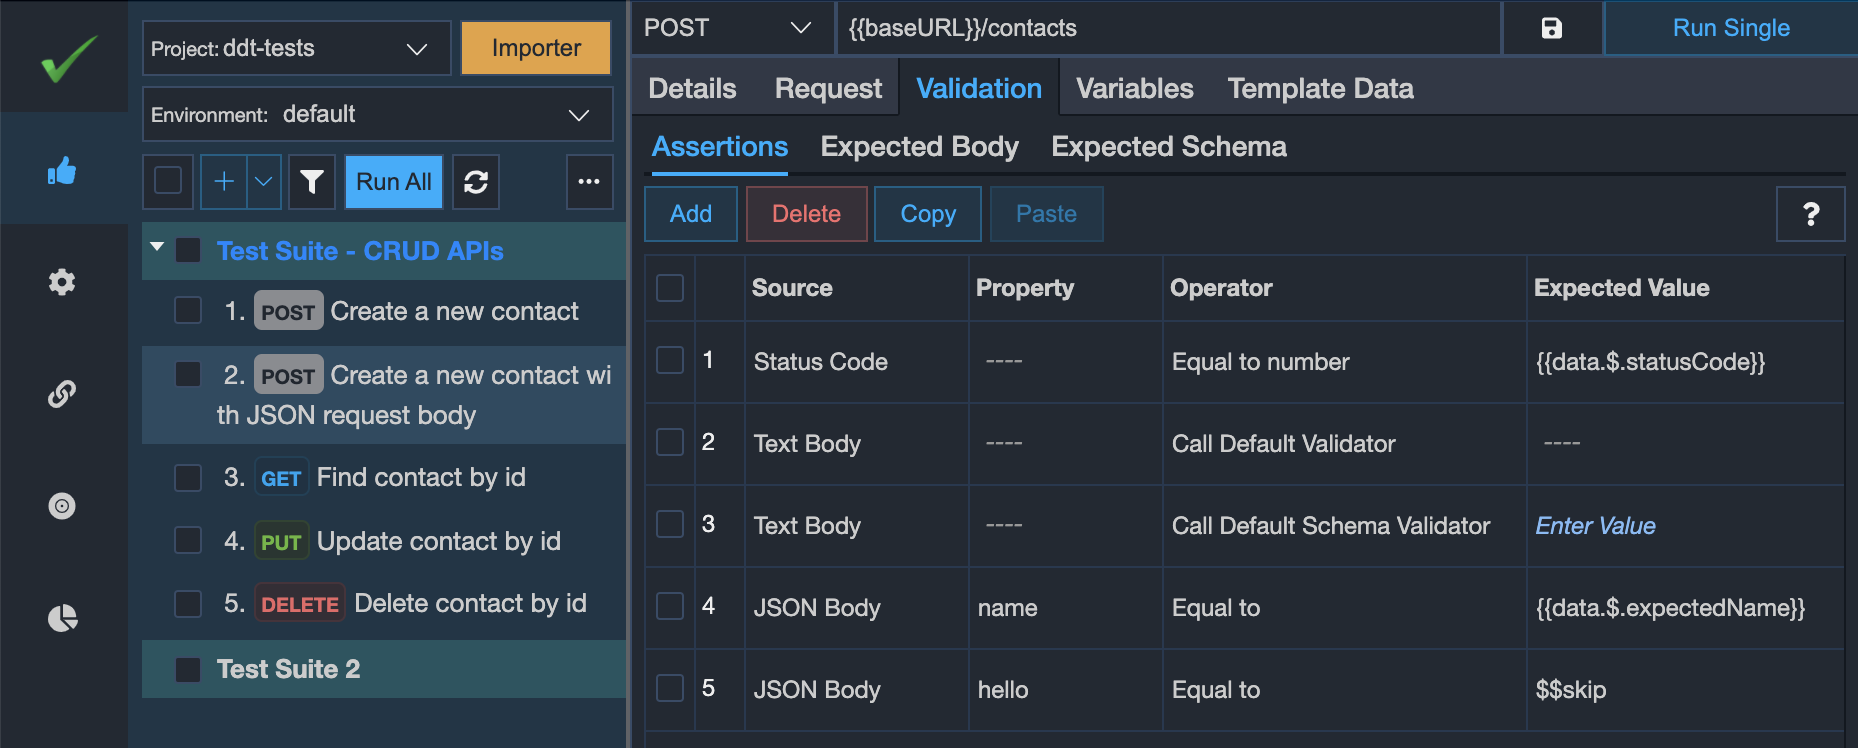
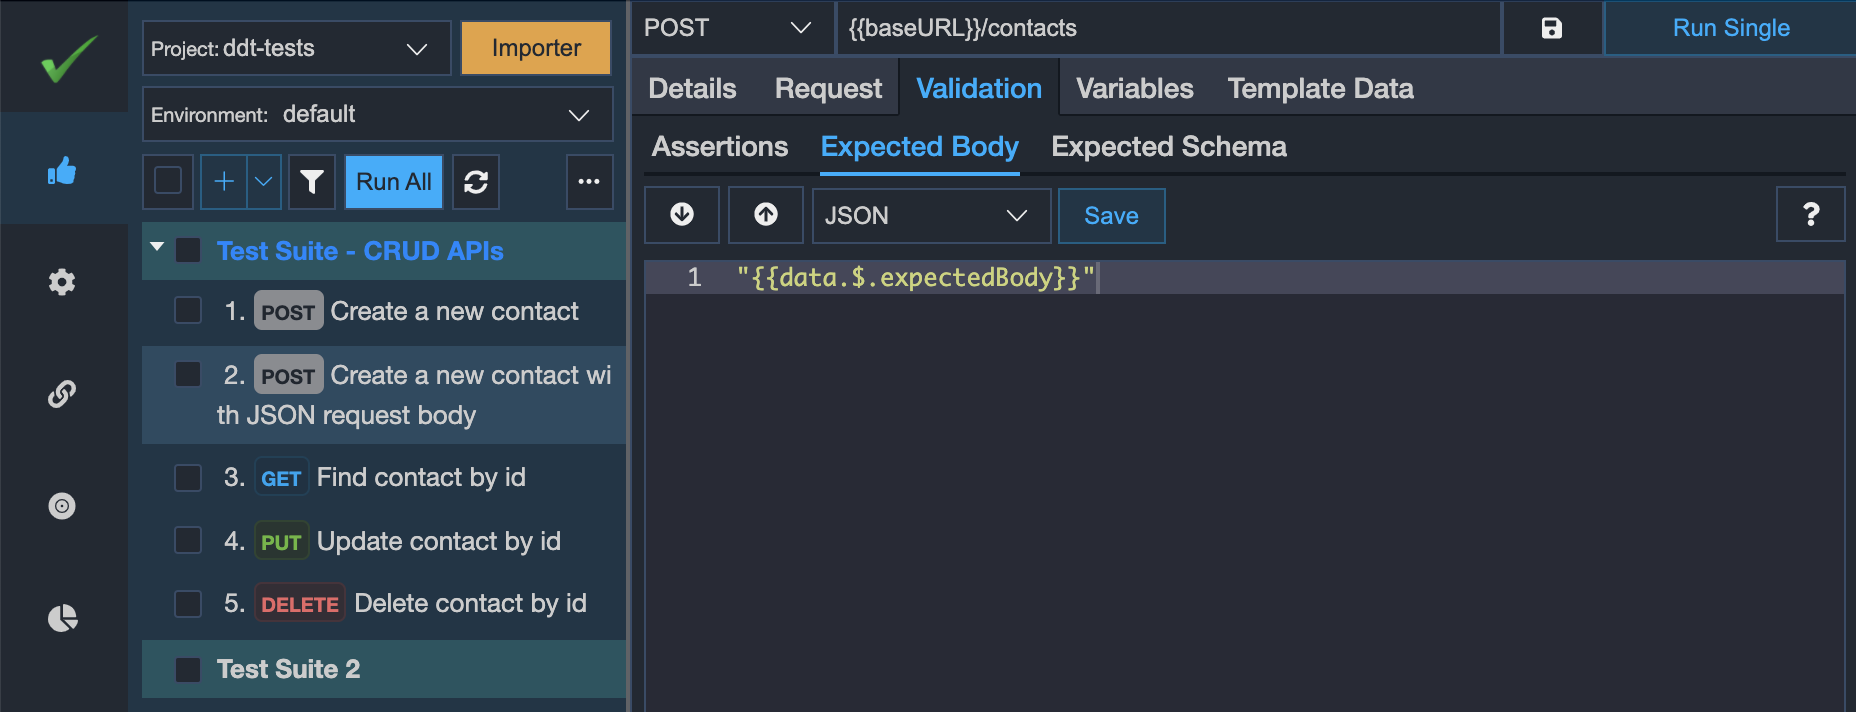
- Similarly, we may validate the API response content of each of our iterations. So, we may write the expected response in the CSV/XLSX file and bind that column in our
Expected Bodysub-tab. vREST also allows you to use any kind of variables, also the special variables ({{*}}) in the CSV/XLSX file.
- We may also validate the response structure of the API response of each of our iterations. Instead of writing the whole response structure inside the CSV/XLSX file, we recommend you just maintain the reference schema name in the CSV/XLSX file. And in the
Expected Schemasub-tab, you may either refer to any of the global schemas or you may refer to the schema definitions inside the Swagger or OpenAPI file as shown in the below screenshot.

- We may also have iteration-specific assertions in our
Assertionstab. For this, just write any normal assertion and bind the expected value with the CSV/XLSX column. And if the column value is$$skipthen that specific assertion will be skipped for that particular iteration. Note that if theExpected Valuecolumn is disabled in UI then you will not be able to skip such assertions for specific iterations.
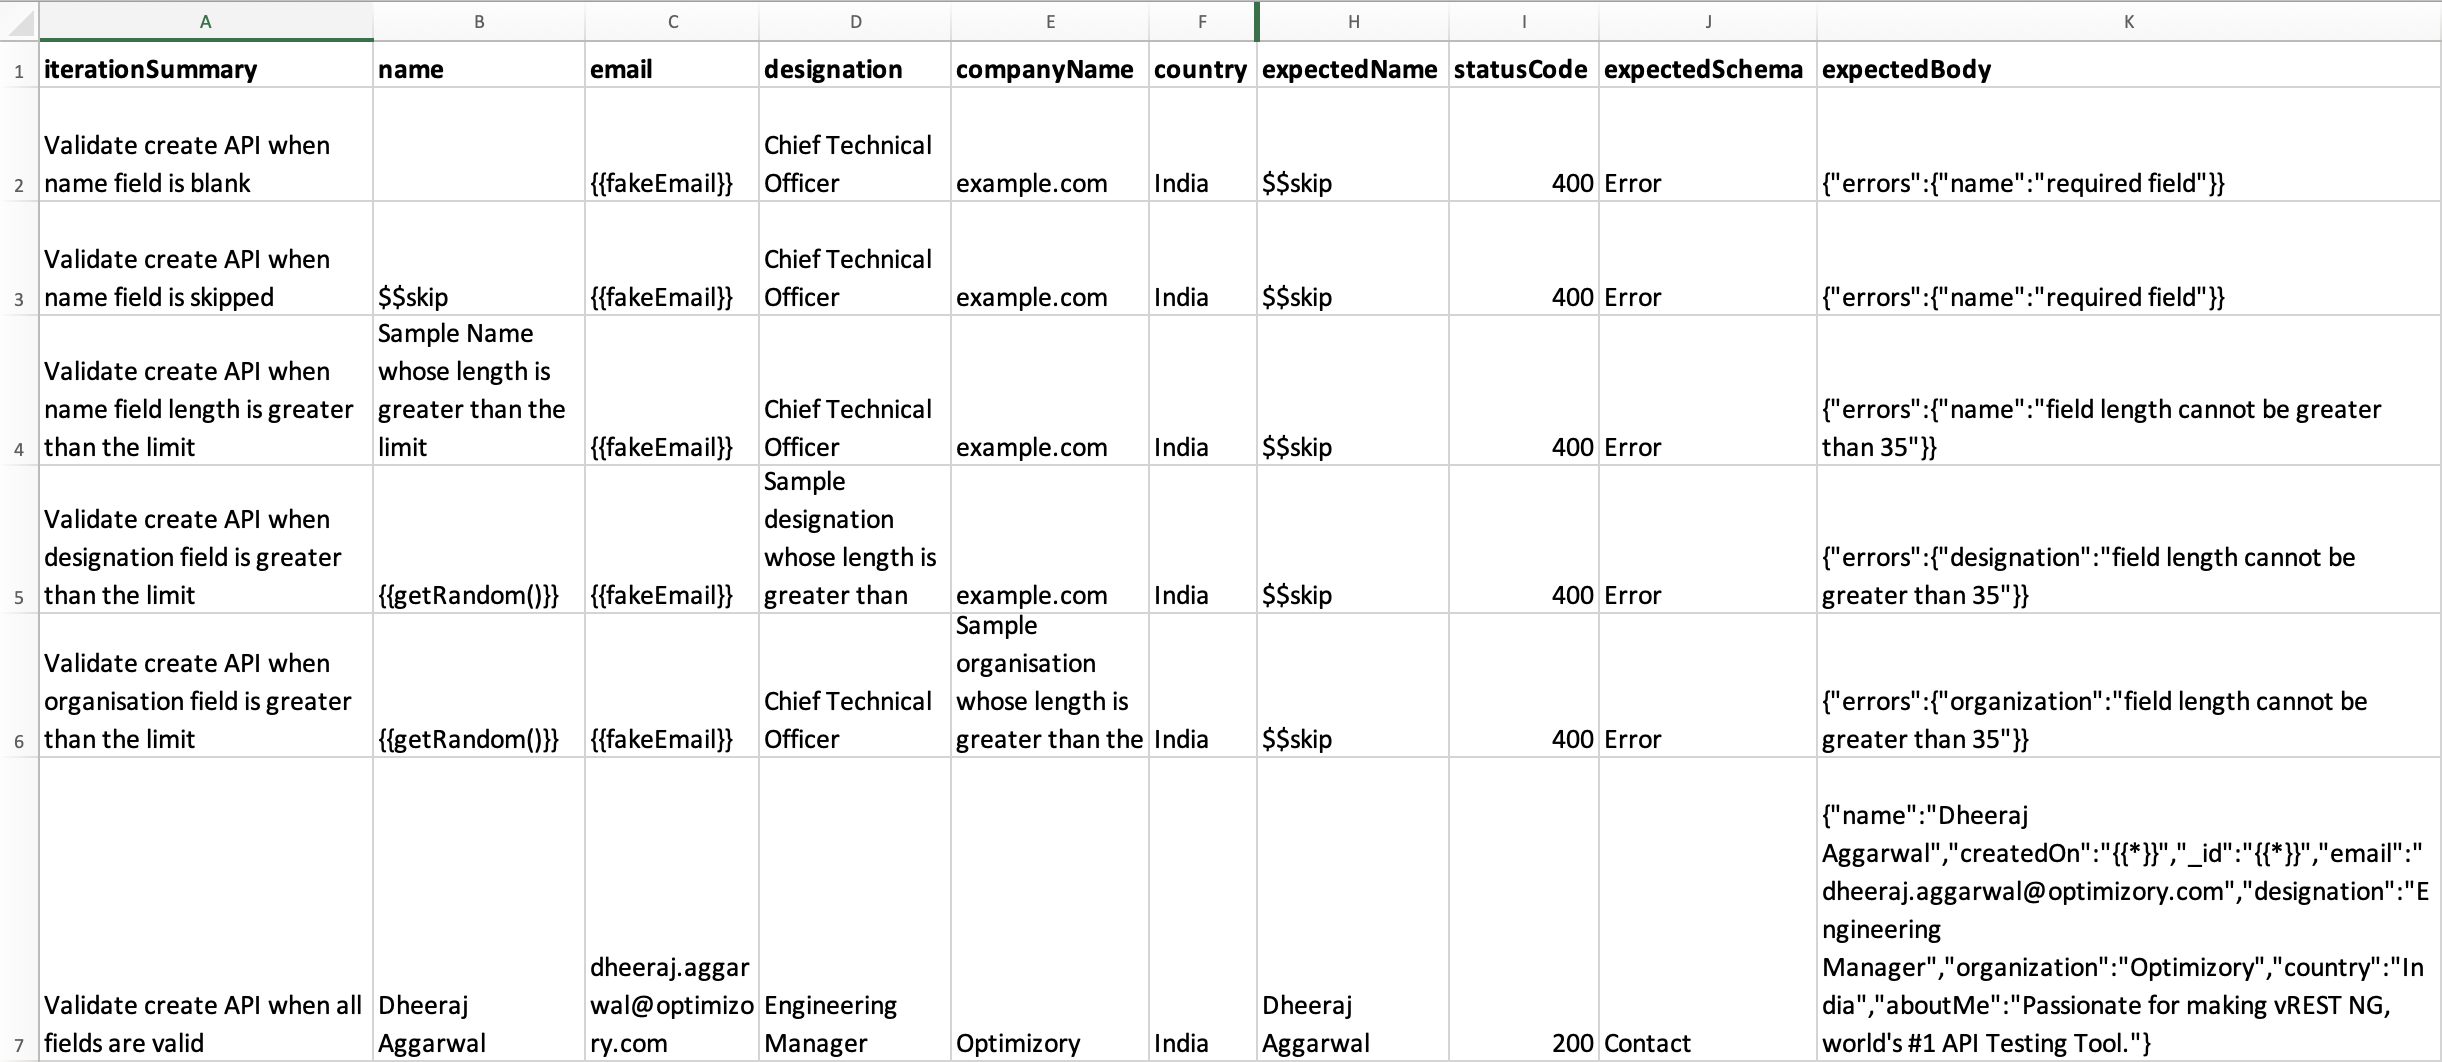
# 6. Writing test data in the spreadsheet file
You may structure your CSV/XLSX file however you want and bind the CSV/XLSX columns inside your API test case at any place. However, there are some specific column names that have special significance in vREST. However, these are also optional columns.
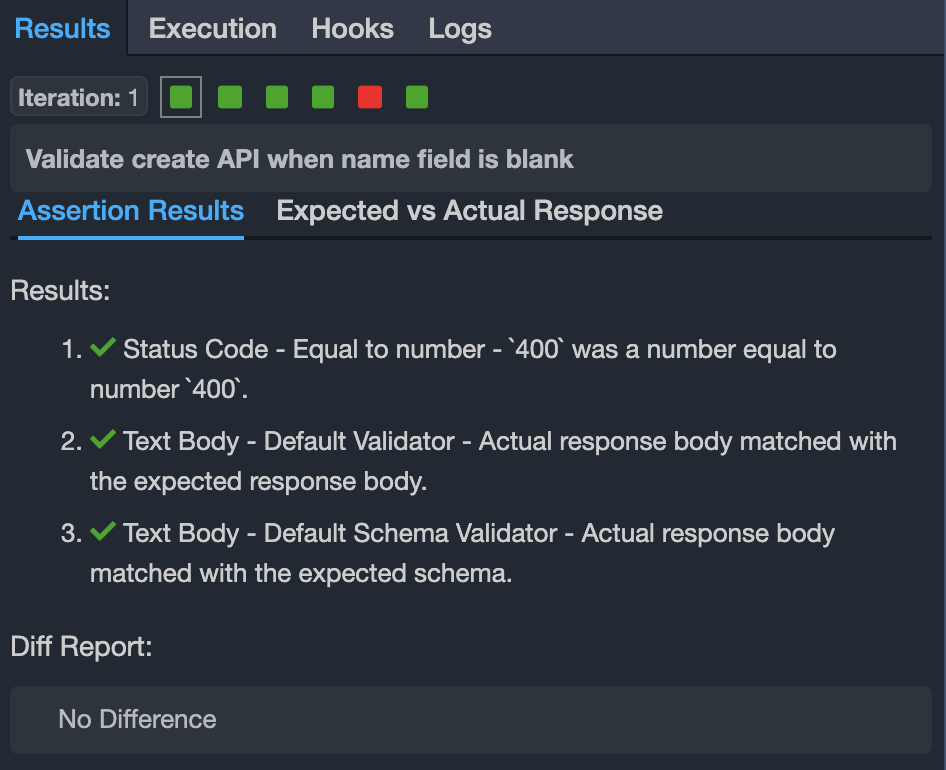
iterationSummary: The purpose of this column is to write a meaningful test summary of the iteration. It will help users to understand, what that particular iteration is doing. And vREST will automatically display the summary information inside the vREST NG application and in theResultstab just after the selected iteration as shown in the below screenshot.
expectedBody: The purpose of this column is to maintain the expected API response of the iteration. If you left this column empty then vREST also allows you to fill this column automatically using the buttonCopy Actual to Expected. Also if the API response changes in the future then vREST allows you to automatically update the value of this column using the same button. So this will help you to quickly fill this column's data without wasting time on manual efforts.
For filling up test data, you may use any global or extracted variables and you may even invoke any utility methods inside the CSV/XLSX columns.
# 7. Running data-driven API tests
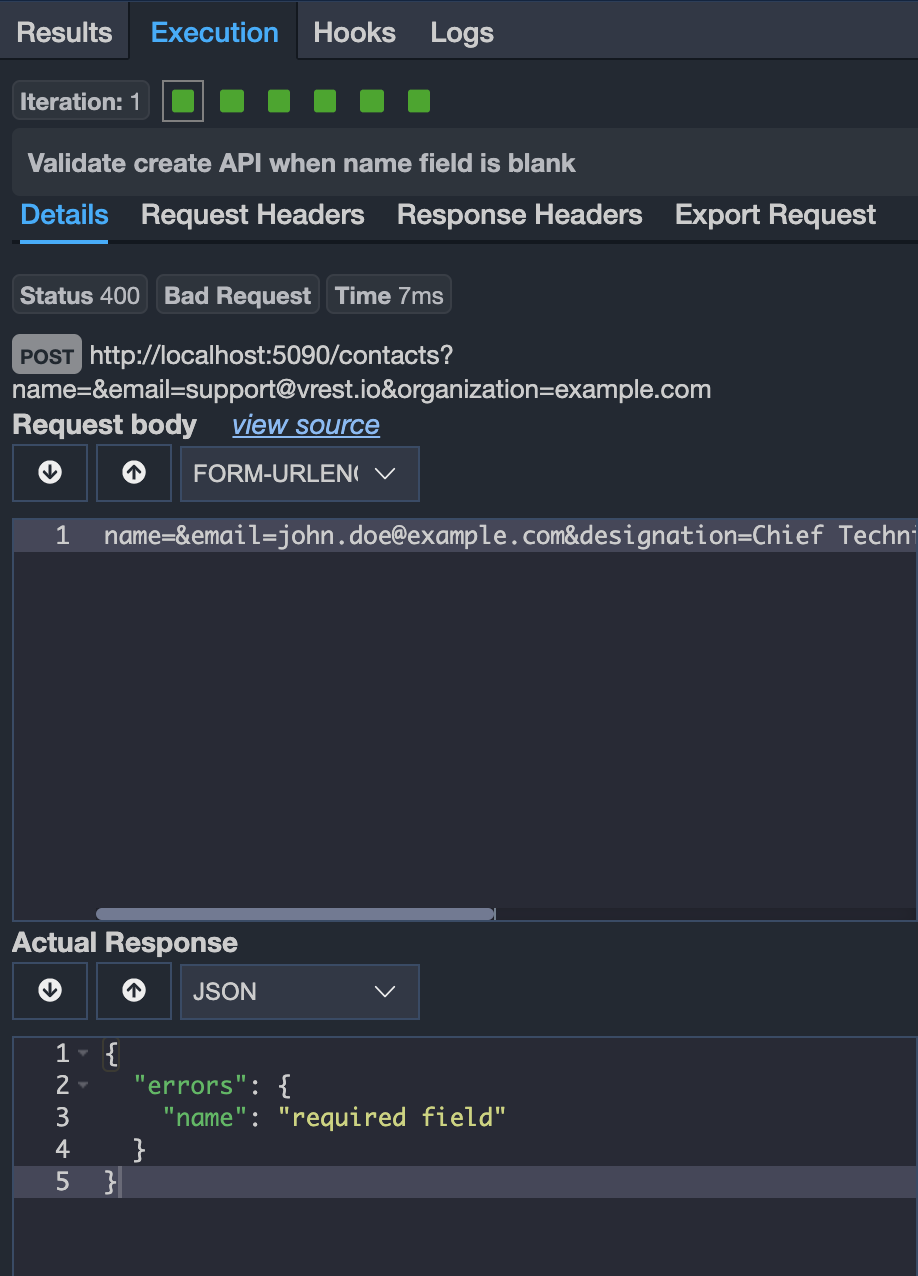
You may run the data-driven API tests in the same way as you run any normal test case. But in the case of a data-driven test, you will have results of multiple iterations based on the specified CSV/XLSX rows. For this, we also display a result matrix view in the Results tab showing the results of each iteration. You may click on individual matrix items to view the iteration summary and results of that particular iteration. And you may also see the execution details of that particular iteration by visiting the Execution tab.
# 8. Maintaining data-driven API tests
Maintenance is the major issue in API testing. Many API test automation fails just due to this issue. vREST addresses this issue in a very simple manner.
Majorly your CSV/XLSX data will need changes due to the following:
Change in request data: For this, vREST allows you to validate the request structure against the OpenAPI/Swagger API operation. So, if you change something in your API specification file then vREST will automatically let you know the faulty tests that need fixes.
Change in API response content: For this, vREST provides a button named
Copy Actual to Expected, that will automatically update the column value with the latest value. If you have used any variables inside theexpectedBodycolumn then vREST will smartly fix the value of your expected body without changing your variables.Change in API response structure: For this, you may just refer to the global schemas or you may refer to the schema definitions from the OpenAPI/Swagger file as well. In case of any API response structure changes, then just update the referred schema definitions and you are ready to go.
# 9. Generating data-driven API tests
vREST also allows you to generate the data-driven API tests using the Swagger/OpenAPI file. For more information on this, please refer to our guide on API Specifications.
# 10. Sample project to demonstrate data-driven testing in vREST
Implementing data-driven testing in vREST is just a piece of cake. For a demonstration of data-driven testing, we will be validating a few of the APIs of our online Contacts Application (this is a CRUD application where you can create, read, update and delete contacts) in the sample project.
You may find the sample project containing test cases and test data files in this Github Repository (opens new window).
# 11. Known issues and their solutions
- For some cells, the cell data is being read as rich text. How we can prevent it? To handle this issue, use a leading single quote character (apostrophe) before the cell text. It is a "code" character used to designate the cell content as Text. Now if you read the data in vREST NG, it will be read as text. Or you may process the content using the utility method.